

The instrument cluster displays critical vehicle information to the user. Continue reading for display functions and descriptions.
Caution: The use of a high-pressure washer may damage the instrument cluster. Wash the vehicle by hand or with a garden hose using mild soap. Certain products, including insect repellents and chemicals, will damage the instrument cluster lens. Do not use alcohol to clean the instrument cluster. Do not allow insect sprays to contact the lens. Immediately clean off any gasoline that splashes on the instrument cluster.
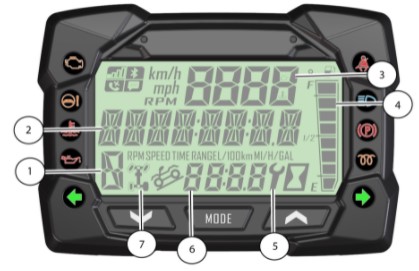
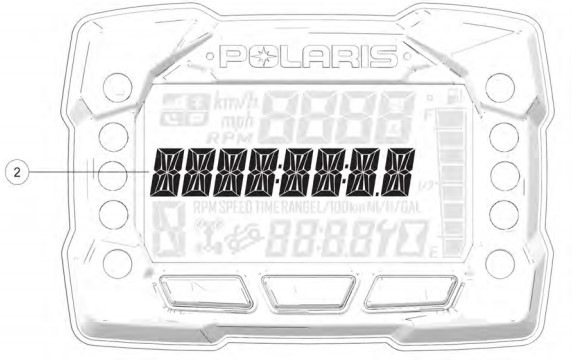
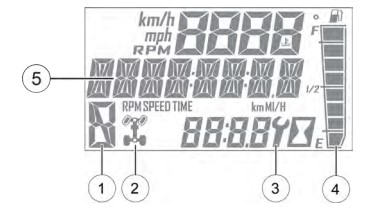
Number | Component | Function |
1 | Gear Indicator | |
H = High Gear L = Low Gear N = Neutral R = Reverse Gear P = Park – = Gear Signal Error | ||
2 | Display Area 2 | This area displays odometer, trip meter, trip meter 2, voltage, engine temperature, engine hour meter, programmable service hour interval, ground speed or engine RPM. |
3 | Display Area 1 | This area displays engine RPM, ground speed or coolant temperature. |
4 | Fuel Gauge | The segments of the fuel gauge show the level of fuel in the fuel tank. When the last segment clears, a low fuel warning is activated. All segments, including the fuel icon, will flash. Refuel immediately. |
5 | Service Indicator | A flashing wrench symbol alerts the operator that the preset service interval has been reached. Your Polaris Dealer can provide scheduled maintenance. |
6 | Clock | The clock display time in a 12–hour or 24–hour format. |
7 | Differential Lock/Turf Mode Indicator (2WD models only) | Indicates wheels being powered. |
Note that some features may not apply to all models.
Instrument Cluster Messages
The instrument cluster has multiple messages that will form in certain conditions:
- "Change Oil" when service hours run out.
- "Warning: Belt Damage Occurring" when the system sees engine RPM but no/low vehicle speed.
- "Warning: Park Brake Engaged" when parking brake is engaged.
Indicator Lamps
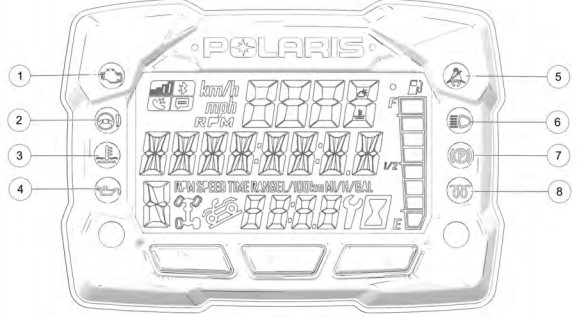
Number | Indicator Lamp Name | Function |
1 | Check Engine | This lamp illuminates when the ECM detects a Diagnostic Trouble Code in the engine management system. Do not operate the vehicle if this warning appears. Serious engine damage could result. Your authorized Polaris Dealer can assist. This lamp will also illuminate if the vehicle is keyed on but not started; it will turn off once the vehicle is started. |
2 | EPS Warning (if equipped) | This lamp illuminates to indicate that EPS has shut down. EPS shuts down automatically 5 minutes after the engine is turned off if the key remains in the ON position. Turn the key off and on to reset the unit. If the light remains on after starting the engine, the EPS system is inoperative. Your Polaris Dealer can assist. |
3 | Engine Hot | This lamp illuminates to indicate an overheated engine. If the indicator flashes, a severe overheating condition exists and the engine will shut down automatically. The vehicle will not start again until the engine has sufficiently cooled down. Whenever this lamp illuminates, the engine load should be reduced in any way possible to avoid overheating and shutting down the engine. |
4 | Low Oil Pressure | This lamp illuminates if engine oil pressure drops below safe operating pressure. If this lamp illuminates while the engine is running, turn the engine off as soon as safely possible and check the oil level. If the oil level is correct and the lamp remains on after the engine is restarted, turn the engine off immediately. |
5 | Seat Belt | This lamp flashes for several seconds when the key is turned to the ON position. The lamp will keep flashing as long as riders’ seat belts are not connected. |
6 | High Beam | This lamp illuminates when the headlamp switch is set to high beam. |
7 | Park Brake Indicator | Indicates the parking brake is active. |
8 | Glow Plug Indicator | This lamp illuminates when the glow plugs are active. The lamp goes out when the engine is ready to start. |
9 | Turn Signals | These lamps (if equipped) illuminate when turn signals are active. |
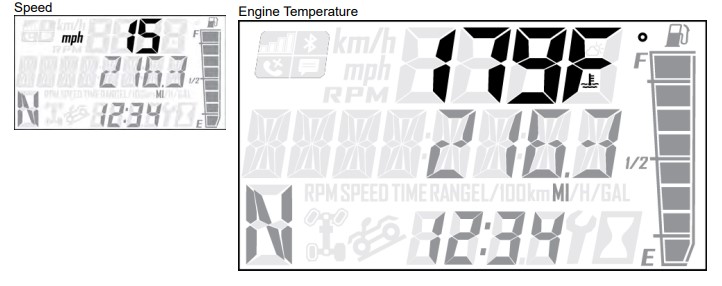
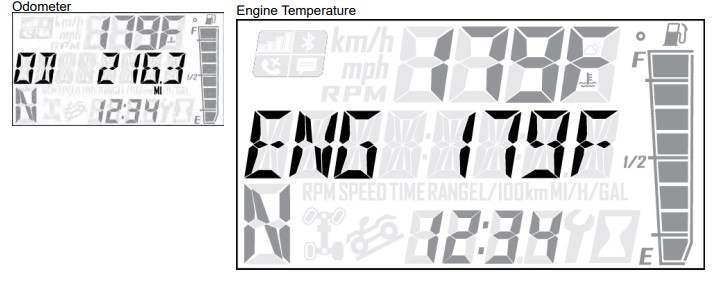
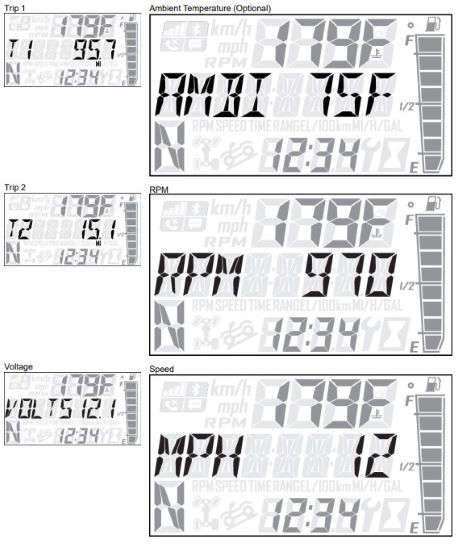
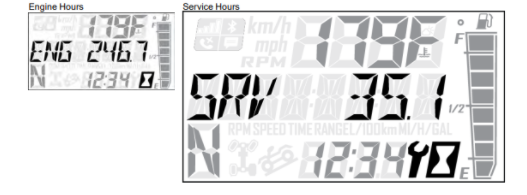
Display Area 1
Display Area 1 shows engine temperature and ambient temperature (if equipped).

Pressing the MODE button will change the information displayed in Area 1.
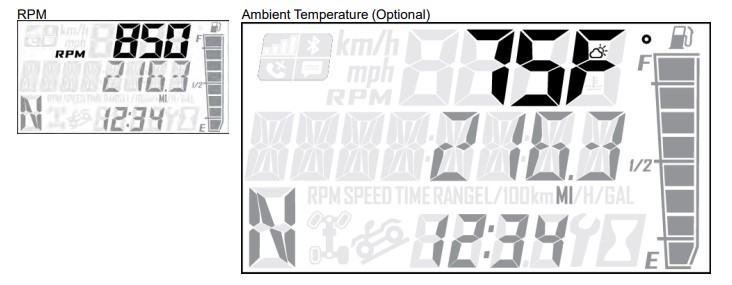
Display Area 2
Display Area 2 shows engine temperature, ambient temperature (if equipped), RPM, speed and service hours.
Toggle the UP/DOWN buttons to change the information displayed in Area 2.
Rider Information Center
Refer to the chart below for a guide to the Rider Information Center.
Number | Component | Function |
1 | Gear Indicator | |
This indicator displays gear shifter position. H = High Gear L = Low Gear N = Neutral R = Reverse Gear P = Park – = Gear Signal Error | ||
2 | AWD Indicator | This indicator shows when AWD is active. |
3 | Service Indicator | A flashing wrench symbol alerts the operator that the preset service interval has been reached. Your Polaris Dealer or other qualified person can provide scheduled maintenance. See Programmable Service Interval in your Owner's Manual for resetting instructions. |
4 | Fuel Gauge | The segments of the fuel gauge show the level of fuel in the fuel tank. When the last segment clears, a low fuel warning is activated. The outline of the fuel display will flash. Refuel immediately. |
5 | Speed Limitation | This vehicle may be equipped with a maximum speed limitation function. This would be displayed on the screen as “LIM” followed by the speed. “LIM 30” for example. |
- The rider information center is in the instrument cluster. All segments will light up for one second at start-up.
- If the instrument cluster fails to illuminate, a battery over-voltage may have occurred and the instrument cluster may have shut off to protect the electronic speedometer. If this occurs, your Polaris Dealer or other qualified person can provide proper diagnosis.
- The information center is set to display standard units of measurement and a 12-hour clock at the factory. To change to metric and/or a 24-hour clock, hold the MODE button and cycle to the clock menu. Use the directional arrows to change the clock settings.
Adjustable Speed Limiting (If Equipped)
Adjustable speed limiting can be found on Pro XD gas models. For more information, read Speed Limiting on Pro XD.
For more information, refer to your Owner’s Manual.
For assistance, see your authorized Pro XD dealer. To find a dealer near you, use the Dealer Locator.
Unless noted, trademarks are the property of Polaris Industries Inc.
© 2022 Polaris Industries Inc.


